Avoiding Common Laminating Mistakes: The Professional’s Guide to Flawless Finishing
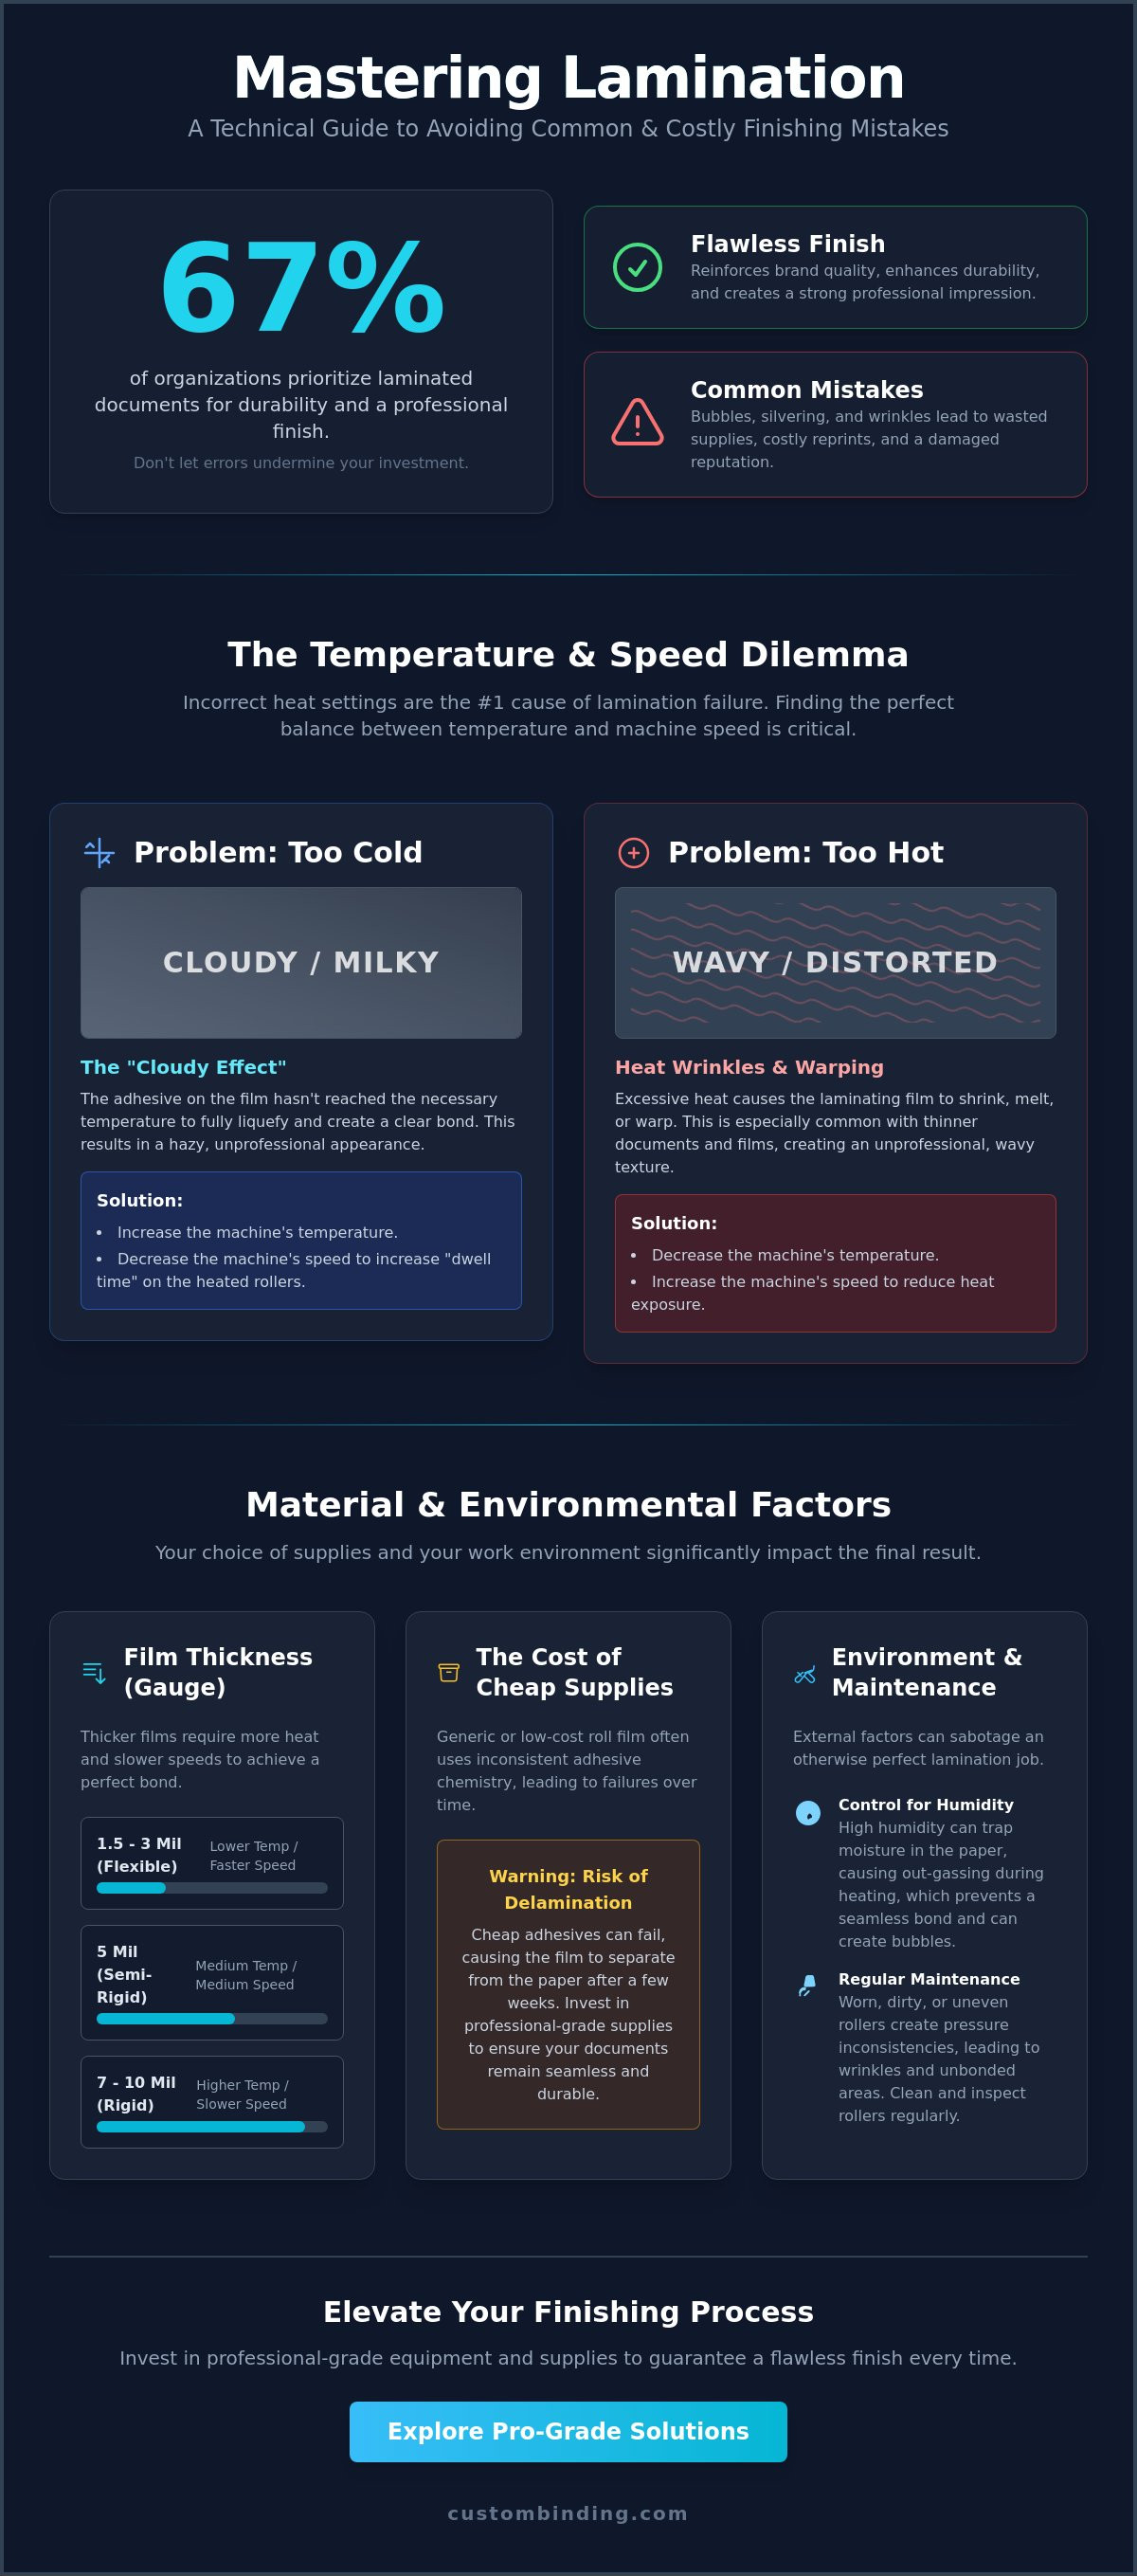
Could a minor oversight in your finishing process be quietly eroding your brand’s reputation? You’ve likely felt the frustration of watching a perfectly printed report emerge from the machine with silvering or unsightly heat-wrinkles. It's a waste of expensive supplies like roll laminating film and, more importantly, it costs you valuable time in a busy production schedule. Mastering the science of avoiding common laminating mistakes is essential for maintaining the high standards your clients expect. When 67% of organizations prioritize laminated documents for durability, there's no room for errors that lead to costly re-prints and professional embarrassment.
This guide provides the technical expertise you need to achieve consistent, bubble-free results every time. We'll explore how environmental factors and precise machine settings impact your final product. You'll learn to identify the early warning signs of equipment wear and how to select the right laminating pouches or films for your specific project. By following these professional protocols, you can ensure a faster turnaround on finishing projects and extend the lifespan of your hardware. Let's transform your document preparation into a seamless, reliable process that delivers a sophisticated finishing touch on every page.
Key Takeaways
- Recognize how a flawless finishing touch reinforces your professional identity and prevents the negative impressions caused by failed lamination.
- Calibrate your equipment's temperature and speed settings to resolve the "cloudy effect" and achieve a transparent, professional-grade result.
- Implement precise material management techniques for avoiding common laminating mistakes such as film telescoping or incorrect gauge selection.
- Control for environmental variables like humidity to prevent moisture out-gassing and ensure a seamless bond between the film and the document.
- Evaluate when your production volume justifies an upgrade to professional-grade hardware for more efficient project turnarounds.
The Impact of Lamination Quality on Your Professional Reputation
A professional presentation isn't truly finished until the final tactile layer is applied. Lamination serves as a durable shield, but it also acts as a visual enhancer that signals high standards and attention to detail. To understand the technical foundation of this process, one might ask, What is Lamination? It's the precise bonding of layers to improve strength, stability, and appearance. When this process fails, the result is more than just a ruined document; it's a damaged reputation. Bubbles, peeling edges, or "silvering" can make even the most sophisticated report look amateurish. This is why avoiding common laminating mistakes is a core competency for any office that values its public image.
The financial impact of finishing errors goes far beyond the price of the film itself. Every mistake requires a full restart. This means wasting high-quality paper, expensive toner, and the labor hours required for re-printing and re-finishing. In a busy production environment, these delays are costly and disruptive. Efficiency isn't just about speed; it's about getting the finish right the first time to ensure every document reflects your professional standards. By viewing lamination as a critical "finishing touch," you elevate simple office supplies into essential tools for corporate storytelling.
Why First Impressions are Tactile
The physical feel of a document provides a subtle, psychological cue to the reader. Choosing between a flexible 5 Mil pouch and a rigid 10 Mil option changes how your information is perceived. A thicker finish suggests longevity and importance, creating a sense of tactile storytelling that digital files cannot replicate. Clear, crisp document finishes allow your content to shine without the distraction of hazy or scratched surfaces. Using high-quality Custom Binding Products helps San Diego firms stand out by delivering a sophisticated finish that feels as impressive as it looks.
The Real Cost of "Cheap" Supplies
Generic roll laminating film often relies on inconsistent adhesive chemistry. While these rolls might look identical to professional-grade options on the shelf, they frequently lead to delamination or poor clarity over time. Professional-grade supplies are a strategic investment in your brand’s longevity. Cheap adhesives can fail under heat or pressure, causing the plastic to separate from the paper after just a few weeks. By avoiding common laminating mistakes like opting for low-cost, generic materials, you guarantee that your documents remain seamless and durable for the long haul.
Temperature and Speed: The "Cloudy vs. Melted" Dilemma
Precision in document finishing requires a deep understanding of thermal dynamics. Incorrect heat settings are the most frequent cause of lamination failure. If your document emerges with a milky or hazy appearance, you've encountered the "Cloudy Effect." This occurs when the rollers haven't reached the necessary temperature to fully liquefy the adhesive. Conversely, a wavy or distorted surface indicates excessive heat, which causes the film to shrink or warp. Balancing these variables is central to avoiding common laminating mistakes that compromise your professional image.
The relationship between machine speed and heat absorption is a critical lever for any operator. High-speed settings reduce the "dwell time," which is the duration the film remains in contact with the heated rollers. If you increase the speed, you must often increase the temperature to compensate. Lowering the speed allows for deeper heat penetration, which is often necessary for thicker materials. Following best practices for great results involves finding the "sweet spot" where the adhesive clarifies perfectly without compromising the structural integrity of the film.
Mastering Thermal Bond Science
Heat activates the specialized adhesive layer on your roll laminating film. Thinner films, such as 1.5 mil, require lower temperatures and faster throughput. Heavier gauges, like 5 mil or 10 mil, demand significantly more thermal energy to achieve a clear bond. Don't rely solely on the "ready" light of a desktop machine. These sensors often measure the temperature of the heating element rather than the rollers themselves. Wait an additional three to five minutes after the light activates to ensure the entire system has reached thermal equilibrium.
Adjusting for Paper Weight and Ink Coverage
The material inside the laminate dictates your settings as much as the film itself. Heavy cardstock acts as a heat sink, drawing thermal energy away from the adhesive. When working with thick media, you'll need to increase the heat or slow the rollers down to maintain a consistent bond. High ink coverage, particularly from digital presses, can also interfere with the bond. The oils and waxes in some toners create a barrier that prevents the adhesive from "biting" into the paper fibers.
To prevent wasted supplies, always use a test strip of the same paper and ink type before running your final project. If you find your current equipment struggling with consistency, consider browsing our selection of professional-grade laminating machines to ensure your output always meets the highest standards. Mastering these adjustments is the most effective way of avoiding common laminating mistakes during high-volume production runs.
Material Mismanagement: Thickness, Alignment, and Telescoping
Achieving a professional finish requires more than just mastering heat and speed settings. Even a perfectly calibrated machine can produce subpar results if the physical materials aren't handled with precision. Avoiding common laminating mistakes often starts with the selection of the film itself and how it's introduced to the rollers. Misalignment or using the wrong gauge can lead to catastrophic equipment jams or documents that fail to meet your brand’s quality standards. A disciplined approach to material management ensures that every project emerges flat, clear, and durable.
One of the most frustrating issues in roll lamination is "telescoping." This occurs when the film roll shifts sideways on its core, causing the edges to become uneven and exposing the adhesive to the rollers. If you notice the film drifting, stop the machine immediately. You must reset the roll by loosening the supply shaft and re-centering the film. For pouch laminators, the most critical rule is the "seal-first" insertion method. Always lead with the factory-sealed edge of the pouch. Inserting the open end first traps air and frequently causes the film to wrap around the internal rollers, leading to a "carrier jam" that can sideline your machine for hours.
Choosing the Right Mil Thickness
Selecting the appropriate mil thickness is a balance between protection and functionality. A 3 Mil film provides excellent flexibility and is ideal for documents that need to be folded, such as menus or maps. In contrast, a 10 Mil film offers maximum rigidity, giving an ID card or reference sheet a heavy, professional-grade feel. Remember that thicker films require more substantial corner-rounding to prevent sharp edges from snagging. If you need a professional presentation without the permanent bond of lamination, consider using clear acetate covers as a sophisticated alternative for reports and proposals.
The Art of the Perfect Feed
Consistent results depend on how you feed the document into the machine. For roll laminators, ensure the top and bottom rolls are perfectly aligned on the supply shafts to maintain even tension, also known as "webbing." Improper tension is a primary cause of longitudinal wrinkles. When using pouches, center the document within the film to leave an even border on all sides. This prevents "dog-eared" corners where the film hasn't bonded correctly. Avoiding common laminating mistakes like off-center feeding will dramatically reduce your waste and ensure a faster turnaround on every finishing project. Follow these steps to maintain a seamless production flow:
- Center the film rolls on the supply shafts using the built-in rulers.
- Adjust the brake tension until the film is taut but not stretching.
- Guide the document slowly into the center of the intake to prevent skewing.
- Use a carrier folder if your machine or film type requires extra stability.
Neglected Maintenance and the San Diego Humidity Factor
Coastal environments present unique challenges for document finishing. San Diego’s humidity can significantly impact the moisture content of your paper stocks. High humidity levels mean paper fibers act like sponges, absorbing moisture from the air. When this damp paper meets the high heat of a laminator, the moisture turns into steam. This process, known as moisture out-gassing, creates small bubbles trapped under the film. It's a frustrating issue that persists even when your machine settings are otherwise perfect. Avoiding common laminating mistakes in coastal regions requires a proactive approach to both storage and machine care.
Adhesive buildup is another silent productivity killer. As film passes through the rollers, small amounts of adhesive can squeeze out and coat the silicone surface. If left uncleaned, this residue becomes tacky and causes documents to wrap around the rollers, leading to expensive downtime. Regular maintenance isn't just about cleaning; it's about identifying when your hardware needs a specialist's touch. For heavy-duty machinery, professional servicing is necessary to ensure the rollers remain perfectly round and free of flat spots. Neglecting these details often leads to a decline in the tactile quality of your finished products.
Combating Humidity in Coastal Environments
Protect your investment by storing paper and film in climate-controlled areas. If you suspect your paper has absorbed moisture, use the "pre-heat" trick. Run the document through the laminator once without any film or pouch. This brief exposure to heat helps bake out residual moisture before the final seal. If bubbles continue to appear despite these efforts, it may be time to call for laminator repair in San Diego due to environmental wear on your internal components. Keeping your materials dry is a simple but effective strategy for avoiding common laminating mistakes.
The Essential Roller Cleaning Routine
Establish a consistent cleaning schedule to prevent adhesive buildup. Use specialized cleaning sheets after every high-volume run to strip away fresh residue. For more stubborn buildup, manual cleaning with a soft cloth and approved roller cleaner is necessary. Never use sharp objects like scissors or knives to remove "wraps" from the rollers. A single nick in the silicone can cause permanent "ghosting" or flat spots on every subsequent document. Watch for these signs of roller damage:
- Repeated marks or indentations in the same spot on every page.
- Uneven pressure leading to one side of the film peeling.
- Visible "waves" in the laminate that don't disappear with heat adjustments.
Consistent care ensures your equipment remains a reliable partner in your professional success. To keep your production line moving without friction, always stock up on high-quality professional laminating supplies designed for durability and ease of use.
Transitioning to Professional Grade: When to Upgrade
Entry-level home-office laminators are often sufficient for occasional, small-scale tasks. However, as your production volume increases, these machines frequently become the primary source of finishing errors. They lack the sophisticated thermal controls and mechanical durability required for consistent, high-quality output. Moving to professional-grade hardware is the final, most effective strategy for avoiding common laminating mistakes. Advanced equipment provides the stability needed to handle complex projects without the constant risk of silvering or mechanical failure.
Professional machines offer features that directly address the pain points of manual document finishing. Integrated cooling fans are essential for setting the adhesive quickly; this prevents the film from curling or developing waves as it exits the rollers. A reliable "reverse" function allows you to safely clear potential jams before they damage the internal components. For San Diego businesses handling large-scale signage or maps, transitioning to wide-format laminators provides a level of speed and precision that desktop models simply cannot match. By investing in hardware designed for continuous operation, you ensure a faster turnaround and a more sophisticated final result for every client presentation.
Identifying the Need for a Roll Laminator
If your team spends hours feeding individual pouches, it's time to calculate the return on investment for a roll system. While pouches are convenient for small batches, roll film is significantly more cost-effective for high-volume runs. Professional models like the Tamerica Optimus-450 provide reliable performance and superior tension control. This automation removes much of the margin for human error, ensuring that your documents remain perfectly flat and transparent. Switching to a roll system allows you to maintain professional standards while drastically reducing the cost per page.
Partnering with a Reliable Specialist
Choosing the right equipment is only half the battle. Successful document finishing requires a partner who understands the nuances of your specific workflow. At Custom Binding Products, we provide more than just hardware; we offer the technical expertise needed to keep your production line moving. Our team provides local San Diego support for setup and training, ensuring your staff knows exactly how to get the most out of every machine. We understand that a bespoke supply order is often necessary to ensure total compatibility with your specialized hardware. This personalized approach is the best way of avoiding common laminating mistakes caused by mismatched materials or improper machine calibration.
Don't let outdated equipment compromise the quality of your work. We are ready to help you find the perfect mechanical solution for your organizational challenges. Contact us for a consultation or repair quote to elevate your finishing process to professional standards.
Achieve a Flawless Finish on Every Project
Precision in document finishing is the result of deliberate preparation and the right environmental controls. From calibrating your thermal settings to managing San Diego's unique humidity, every step you take ensures your materials meet the highest professional standards. Mastery of these techniques is the most effective way of avoiding common laminating mistakes and protecting your brand's reputation for excellence. When you treat the lamination process as a science of preparation, every document you produce becomes a testament to your organization’s attention to detail.
Since 1988, Custom Binding Products has served as a dedicated partner to the local business community. We offer on-site repair services for all major brands and provide wholesale pricing on premium roll laminating film to keep your production costs manageable. Whether you're looking for a specific mechanical solution or need a bespoke supply order, our specialists are here to remove the friction from your finishing process. Browse Professional Laminating Equipment and Supplies to find the tools you need for a sophisticated, durable finish. Let's ensure your next presentation is as impressive as the work inside it.
Frequently Asked Questions
Why is my lamination coming out cloudy?
Cloudy results indicate that the adhesive hasn't reached its required melting point. Increase your machine's temperature setting by 5 to 10 degrees or slow down the throughput speed to allow more dwell time on the rollers. If the issue persists, ensure you've allowed the rollers to fully reach thermal equilibrium. This usually takes several minutes beyond the initial activation of the "ready" light on most professional-grade machines.
What causes bubbles in lamination and how do I fix them?
Bubbles typically stem from excessive heat or trapped moisture within the paper fibers. Lower the temperature setting slightly to see if the air pockets disappear. If you are working in a coastal environment, the bubbles may be caused by moisture out-gassing. In these cases, avoiding common laminating mistakes involves pre-heating the document by running it through the machine once without film to dry the paper stock thoroughly.
Can I laminate a document that was printed on an inkjet printer?
You can laminate inkjet prints, but you must allow the ink to dry completely for at least 24 hours before finishing. Because inkjet inks are water-based, any residual moisture can vaporize under the heat of a thermal laminator, causing bubbles or ink blurring. For the best results, use a high-quality pouch or roll film that features a low-melt adhesive specifically designed to protect heat-sensitive digital inks.
How do I get a stuck pouch out of my laminator?
Activate the reverse function on your machine immediately to back the pouch out of the intake rollers. Never attempt to pull the document through the exit or use sharp metal objects like scissors to clear a jam; this will permanently damage the silicone rollers. If the pouch is completely wrapped around the roller, turn off the heat and contact a specialist for professional extraction to avoid costly equipment replacement.
Is it better to use a carrier or go without one?
Consult your machine’s manual to determine if a carrier is required for your specific model. Many modern professional-grade laminators are designed to be carrier-free, which improves heat transfer and speeds up production. However, using a carrier is a reliable way of avoiding common laminating mistakes like adhesive buildup on rollers, especially when you are laminating small items or documents with significant edge bleed or high ink coverage.
How often should I clean my laminator rollers?
Clean your rollers after every high-volume production run or at the end of each workday if the machine is used constantly. Regular cleaning prevents adhesive residue from hardening and causing "wraps" or document jams. Use specialized cleaning sheets to strip away fresh adhesive, or a soft, lint-free cloth with an approved roller cleaner for more stubborn buildup on your professional-grade equipment to maintain a seamless finish.
Does humidity in San Diego affect my lamination results?
San Diego’s coastal humidity significantly impacts lamination by increasing the moisture content in your paper stocks. This extra moisture often leads to silvering or bubbling as the heat turns the trapped water into steam during the bonding process. Store your supplies in a climate-controlled room and consider using a dehumidifier in your production area to maintain a consistent environment for all your professional finishing projects.
What is the difference between thermal and cold lamination?
Thermal lamination uses heated rollers to melt a glue layer onto the document, providing a permanent and highly durable bond. Cold lamination relies on pressure and a self-adhesive film, making it the preferred choice for heat-sensitive materials like certain vinyls or photographs. While thermal is the industry standard for durability, cold lamination is essential for items that might melt, warp, or discolor when exposed to high temperatures.
Recent Posts
-
Avoiding Common Laminating Mistakes: The Professional’s Guide to Flawless Finishing
Could a minor oversight in your finishing process be quietly eroding your brand’s reputation? You’ …May 11th 2026 -
The Best Binding Method for Training Manuals: A 2026 Professional Guide
A training manual that falls apart in a week isn't just a document. It's a direct reflection of yo …May 10th 2026 -
How to Choose a Binding Machine for a Small Business in 2026
With the global binding machine market projected to reach $1.64 billion in 2026, the demand for so …May 9th 2026